A is for Aden and Z is for Zanzabar


A is for Aden and Z is for Zanzibar... Now what is between? For the world wide classical era philatelist and stamp collector, a country specific philatelic survey is offered by the blog author, Jim Jackson, with two albums: Big Blue, aka Scott International Part 1 (checklists available), and Deep Blue, aka William Steiner's Stamp Album Web PDF pages. In addition, "Bud" offers commentary and a look at his completely filled Big Blue. Interested? So into the Blues...

Tuesday, May 29, 2018

French India - Bud's Big Blue

Franco-Tamil Blend in India
Bud's Big Blue
Bud's Observations
When French postage stamps were introduced in 1859, French India had been reduced to a few dots along the Bay of Bengal coastline, all of declining economic importance, the largest being Pondichéry. Not until 1892 were unique stamps issued for French India, these used only for mail to other colonies and France. British post offices claimed the rest. 

Stamps of India were adopted in 1954, eight years prior to formal union of French India with India.

French cultural influence, however, extended far beyond the few dots. Much of southeastern India has eye-catching, often vigorous, remnants of Franco-Tamil culture -- art, architecture, cuisine, language, furniture, names of places and, of course, stamps

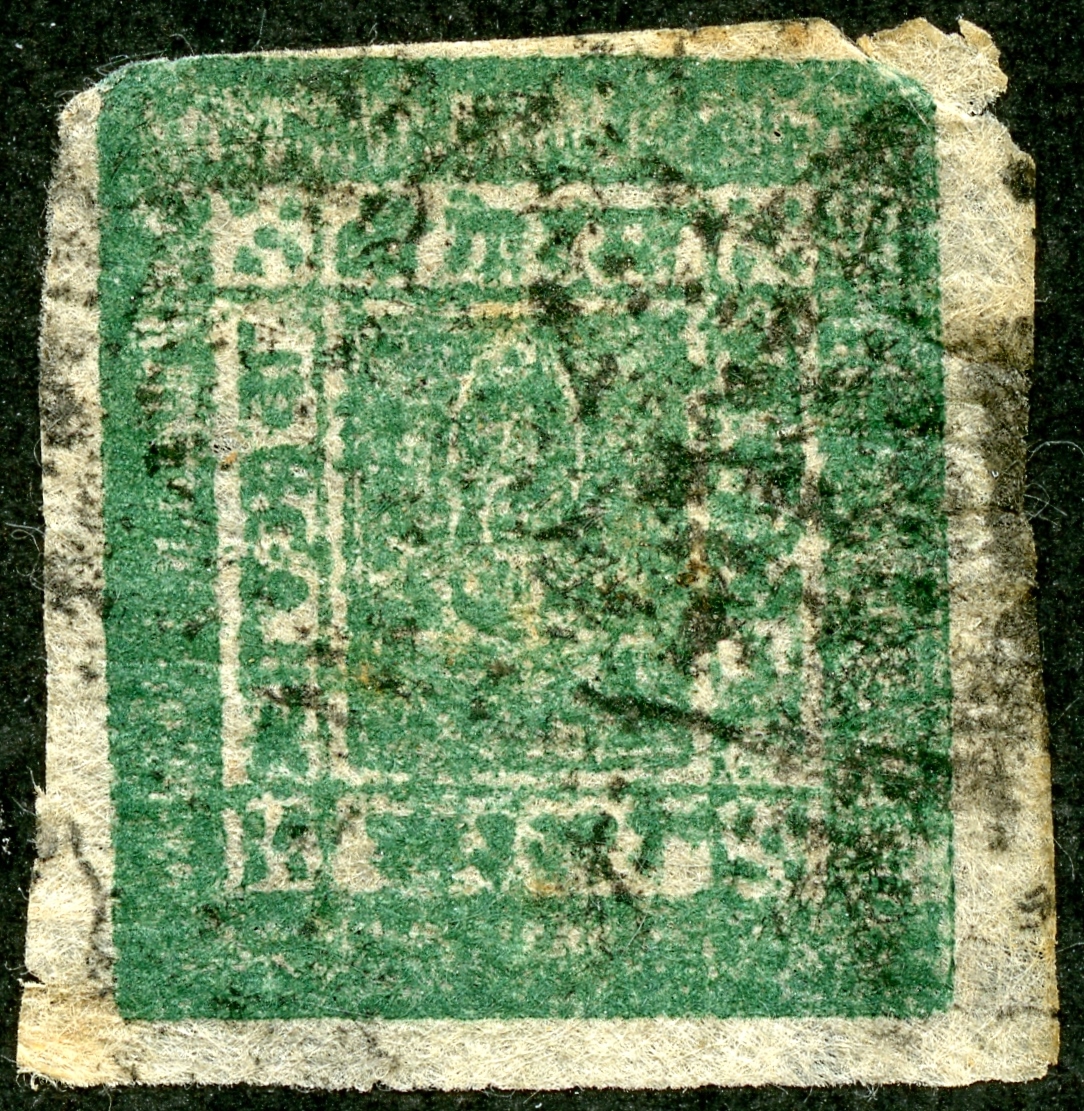
That which is decidedly French has a subtle Tamil zest; what is clearly Tamil has a delicate French aroma. In all, an appealing blend. The Brahma divinity and Kali Temple on French India’s most common stamps illustrate the point.

Cancels, including all of mine, are commonly Pondicherry; those of other settlements, difficult to find.

Census: 84 in BB spaces, 37 on supplement pages.

Jim's Observations
The French had much greater influence in the mid-eighteen century, but after losing conflicts first with the Dutch, then with the British, their influence shrank by the twentieth century to just a few settlements. By 1941, the area for French India was 196 square miles, the population was 320,000, and the administrative Capital was Pondichéry. 

By 1954, all of the French holdings were de facto part of the Indian Union. But the French influence (language, architecture, churches, culture) today remains strong in Pondicherry and Yanam.

French India Blog Post and BB Checklist

Page 1 (Click and enlarge for examination)

1a

1b

1c

Page 2

2a

2b

2c

Page 3

3a

3b

3c

Supplements
Page 1

Page 2

Comments appreciated!

Wednesday, May 23, 2018

Closeup study of Stamp surfaces using a Digital Microscope Part III

USA 1918 Scott C3 24c carmine rose & blue
"Curtiss Jenny" with a Digital Microscope
Into the Deep Blue
Part III (this post) will explore paper varieties with the digital microscope.

Specifically....
Wove
Native
Granite
Varnish Bars on paper
Chalky

This will be followed up by a comparison demonstration  of a scanner's capabilities versus a digital microscope's capabilities on stamp surface details. I hope the results will show that the DM is a useful adjunct to a scanner for the inquisitive stamp collector.

Part II (the last post) looked at lithographic and photogravure printed stamps with the DM.

Digital Microscope, HDMI connection, and Monitor
Part I covered an introduction to the Digital Microscope, and examples of engraved, embossed, and typographic stamps with the DM.

OK, let's begin...

Paper
Paper is generally an organic weave of cellulose fibers. The fibers may be from wood, bark, straw, grasses, and linen or cotton rags may have been added. I don't know how far one can determine different makeups of paper by using a digital microscope, but the DM does give a good view of the paper surface and it's fibers.

Wove
In Wove paper, the texture tends to be smooth and even. Most stamps are composed of some variation of wove paper. All the images of stamps for these posts exploring stamp surfaces with the DM are on wove paper, unless specified otherwise.

Horizontally Laid Paper -1866 Russia issue
Scan @ 1200
There is also laid paper. One can see the parallel dark lines on the back of the stamp. Of interest, I tried to take a DM pic of this stamp, but the close up details made it not as obvious as merely looking at the entire back side of the stamp. 

Native
Native papers can be a type of wove, but using available native materials . They are handmade papers, and they might show inclusions.

1886 Nepal Scott 9  4a green- Native Wove
As an example, for Nepal, beginning in 1886, native wove paper was used, producing  the imperforate three denominations. The paper was derived from the inner bark of a native evergreen from the mountains of Nepal.

1986 Nepal Scott 8 2a violet close-up
Digital Microscope (Enlarge for examination)
Threads are running everywhere. This looks remarkably different than machine made paper.

1886 Nepal 8 2a violet close-up
Digital Microscope
It seems like it would be interesting to do a DM study on native papers, and their surface characteristics. A project for another time. 

1886 Nepal 9 4a green
Digital Microscope
This definitely looks like a type of tight wove, with threads on the surface placed in all directions.

1898 Afghanistan F10 2ab black/green
Thin Wove paper, scanned @ 1200
Just for fun, I looked at an Afghanistan 1898 registration stamp. My stamp is on extremely thin paper. Scott states it is "thin wove paper". Although it is very thin (like cigarette paper), I suppose this is not pelure paper, as it is not hard or brittle.

1898 Afghanistan F10 2ab black/green
Digital Microscope
The paper appears handmade (as one would expect), and has some strands on the surface.

Granite
Austria and Switzerland stamps can be found with colored fibers embedded within the paper. Although obvious usually, I thought it would be interesting to put one under the DM.

1918 Austria Scott 198 4k yellow green (II)
Austrian Stamps of 1916-18 Overprinted
Scanned @ 1200
A quick look at the scanned stamp already shows the fibers. But one of the dilemmas (especially for forgery detection) is what is on top of what? - the cancel or the overprint?

1918 Austria Scott 198 4k yellow green (II)
Digital Microscope (Enlarge for examination)
I think the cancel is on top of the overprint, but one can see how difficult it is to sometimes to make that determination. A binocular microscope (stereo vision) might add confirmation.

Varnish Bars on paper
 1901 Austria 82a 60h brown "Franz Josef"
Scanned @ 1200, Varnish Bars?
Can the DM shed some light on determining ordinary issues from those that have varnish bars for the 1899-1904 Austria issues?

1901 Austria 82a 60h brown 
Digital Microscope
The DM does provide some information. Here note the glaze clearly over this stamp. I found it is better to use direct lighting provided by the microscope to see the results.

But overall, it was a disappointment. The DM did not seem to do better than holding the stamp at an angle to the light. I was hoping the varnish would reflect and light up the stamp like a Christmas tree. ;-) Perhaps the results will get better with improving my technique.

Chalky
Chalky versus ordinary paper stamps is vexing for the WW collector. There are multiple ways to check for "chalky", none of them completely satisfactory.

Can the DM add useful information?

I will preface the 'show and tell" by saying that one has to be careful about assuming a result for a single "chalky" stamp or "chalky" issue for a country is true for all "chalky" stamps and countries.

Why?

Because the way the chalk was applied, the type of 'chalk" used, and the type of paper for an issue can differ - enough, in my view, so DM results may not apply generally.

One is on safest grounds when one investigates a particular issue, and achieves DM results regarding the characteristics of 'chalky" just for that issue. Another 'chalky" issue from another country might have different findings.

1908 Austria Scott 116a 12h scarlet "Franz I"
Scanned @ 1200
The Austria 12h scarlet can exist as both ordinary paper and chalky. The chalky variety is actually a little less expensive (CV <$1 unused; $1+ used) than the ordinary paper (CV $1+ unused; $2+ used).

1908 Austria Scott 116a 12h scarlet 
Digital Microscope
The DM shows a surface that appears glazed - not as much paper detail is apparent.

1908 Austria Scott 116a 12h scarlet 
Digital Microscope
Even the cancel does not seems embedded in the paper.

1908 Austria Scott 116a 12h scarlet 
Digital Microscope X 55
There are some reports that chalky surfaces, under magnification, will show "craters". Here I don't see much - perhaps 1-2 small round indentations one could call "craters". What I do see more is a glazed surface, and a number of white chalky small "hillocks" that rise above the surface.

1913 Azores 159 2c carmine "Ceres"
Scanned @ 1200
Portugal and the Portuguese colonies have several issues where numerous stamps exist as chalky/ordinary.  Among them is the Azores 2c carmine "Ceres" stamp.

1913 Azores 159 2c carmine "Ceres"
Digital Microscope (Click to enlarge)
The DM shows a lack of ordinary paper fiber details, and an appearance of chalky material on the surface. But note again the "hillocks" (a term that is used to describe small hills on the moon), especially within the colored interior to the right of the "Ceres" head. No craters are visible.

I'm afraid much more research would need to be done on my part on the "chalky" issues before I really could tell what are the important "chalky" findings  using a DM.

O.K., lets now look at the capabilities of scans compared to the digital microscope....

Evaluation of Stamp Surface Detail: Scan (@1200, @2400, @4800) vs Digital Microscope

Digital Microscope Setup
If you have read this far, you might be willing to concede that a digital microscope is able to provide good surface detail. 

But, shouldn't a scanner be able to do the same thing? After all, isn't a decent scanner good for @ 1200, @ 2400, @ 4800 resolution, or even more?

What is the ultimate capability of a scan, especially on stamp surface detail?

Overall, I think I do a competent job with scanning, using minimal digital manipulation, and with the goal of presenting a "natural" image of the stamp.

My usual scanning parameters and procedures are...

Epson V600
Professional Mode
Document
24 bit color
1200 dpi
No unsharp mask
No Descreening
"Show Texture"
No adjustments to Histogram, Tone correction, Image adjustment
Image Format = jpeg; Compression level - None
1.97 MB
No document slew correction

Open in Windows Live Photo Gallery where image scan is straightened and cropped. No auto adjustment applied.

But there are some that do an even better presentation, in my opinion.

Take a look...
It is difficult to use 100% of the capability of the Epson V600 scanner (hardware plus use of included or substituted software (Photoshop, VueScan)). There is a steep learning curve. I'm still on the curve despite seven years of experience and thousands of stamp scans. The best stamp scans I have seen using an Epson scanner, including a remarkable degree of surface detail, are made by Dan Harding ( revenuecollector) as presented on the Stamp Community Family Forum.

So, although I will be comparing my own stamp scans with my digital microscope stamp pics, I admit that my scans are not the last word in terms of extracting surface detail.

Let's begin......
1915 Belgium Scott 118 50c carmine rose & black
"Library at Louvain", Engraved; Scanned @ 1200; 1.47 MB
We will be looking at the lovely stamp above, the 1915 Belgium 50c carmine rose & black. We will be comparing my digital microscope views with my scanner views @ 1200, @2400, & @ 4800.

1915 Belgium Scott 118 Close-up
Scanned @ 1200
It is necessary to take a section of the stamp and compare views. Here is the "Louvain" section @ 1200.

Not bad. Certainly, all the design detail appears to be there. In fact, I rarely have heard among obsessive collectors that a stamp needs to be scanned at more than @1200. Actually, a number of collectors are perfectly content to scan @ 600, or even @ 300.

1915 Belgium Scott 118 Close-up
Using Digital Microscope and side-lighting
Here is the comparable "Louvain" DM view.

Really nice.

And note here one can see the paper details. Some of that has to do with the way "light" is utilized. With the DM, the lighting I use is oblique, bringing out surface details as was noted with the moon pic. With the scanner, the lighting is directly above, which actually can wash out surface detail.

And as it turns out, no amount of resolution is going to be able to fix that, as we will see soon.

But to really compare, we are going to have to take even a smaller section - I picked the "O U" part of "Louvain". This represents about 2 mm length of the actual stamp..

First up in this battle royal is the scanner ( an Epson Perfection V600 Photo), an instrument that is no slouch, and has an advertised optical resolution of 6400 dpi.

Let's show the "O U" sections @ 1200, @ 2400, @ 4800 respectively.

Original Size @ 1200
This is the original (true) size of the "U O" section @ 1200. The length is now about 18 mm, a 9 X magnification.

Original Size @ 2400
This is the original (true) size of the "U O" section @ 2400. The length is now about 36 mm, an 18 X magnification.

Original Size @ 4800
This is the original (true) size of the "U O" section @ 4800. The length is now 72 mm, a 36 X magnification.

But, can we tell if the "apparent" resolution (useful information contained in the scan) is improving with these scans as we increase the actual resolution?

Well, certainly, the @4800 resolution image is larger. And that is a problem for comparison, as the eye always prefers a larger image: more rods and cones are involved.

So, to level the playing field, we are going to present the scans again, but all at the same (large) size.
Then perhaps we can judge if the @ 4800 scan is really worth more in apparent resolution (useful information), or will a lower @ 2400 or @ 1200 provide the same useful information.

So here goes..
"O U" detail Close-up (Scaled to Large Size)
Scanned @ 1200
Here is the scan for 1200, scaled to a larger size.

I must say the paper detail is not very evident.

On the other hand, scanning @ 1200 for a stamp is not much of a chore - does not take long. It is the practical "gold standard" for usual high end scanning. I scan all my stamps for this blog @ 1200, which some folks would consider overkill. (And BTW, my jpg images are done with no jpg compression applied.)

"O U" detail Close-up (Scaled to large Size)
Scanned @ 2400
Here is the 2400 scan at a large size (same size as the 1200 previous image). The pixels should be smaller, and theoretically, this scan should contain more discrete information. And, in fact, if you take the 1200 image and the 2400 image and enlarge them so the individual pixels are evident, one will note that the 2400 image has smaller pixels, and a bit more discrete information.

But let's do a reality check.

The 2400 scan does not really contain more useful information on surface characteristics.

And the overall (slight) improvement in the 2400 scan, compared to a 1200 scan, hardly justifies the time and large megabytes to do a 2400 scan.

And lets discuss the true abilities of the Epson V 600 scanner, and other 'good" scanners like it. Although the Epson scanner advertises a 6400 dpi optical capability, in reality, the practical useful optical ability is in the neighborhood of 2400. (Does this shock you? I base this statement on the judgement of people who are experts and critics in this area.)

"O U" detail Close-up (Scaled to large Size)
Scanned @ 4800
O.K., here is a scan @ 4800. I confess, I have not done a scan with my machine at this level of resolution before. Let's just say you better pick a very small section of stamp to scan, otherwise, it will take awhile.

I'm afraid there is no more surface details than before. For those that think one can eventually obtain surface detail by scanning at a very high resolution, I'm sorry to disappoint you.

You want to see surface detail?

Look at the next image...

"O U" detail Close-up (Scaled to Large Size)
Digital Microscope (about 55 X magnification)
(If one wishes, one can click and enlarge to actual (true) size)
Wow!

Note the paper flaw (divot) at the bottom middle of the "U"? The scan images might make you believe that was in the design of the "U". The surface details are very important in the total evaluation of a stamp.

The scans did a poor job in this regard. And increasing the resolution of the scans did not help.

The digital microscope ?

Magnificent!

At this juncture, I was going to show a second example of digital microscope vs scans with another part of the Belgium 50c carmine rose & black stamp, but I think I've already demonstrated my assertion.

Rather, let me just show that part of the Belgium stamp, and a close-up, both using the DM.

1915 Belgium Scott 118 Close-up
Using Digital Microscope and side-lighting
The texture is there with the DM. 

Detail Close-up (Showing actual true size @ 55X)
Digital Microscope
And a close-up, using the DM.

Very nice.

1913 USA Scott Q2 2c carmine rose
"City Carrier" close-up with DM
Out of the Blue
This concludes the three part series on the uses of the digital microscope for exploring stamp surfaces. I think I only "scratched" the surface. (Intentional pun)

I'm sold on the ability of the DM to show amazingly realistic detailed views of the ink-stamp surface interface.

Since stamp detail, rather than surface characteristics, is well within the capabilities of the scanner, I will continue to scan stamps @1200. I'm not convinced that @2400 or @4800 adds very much to a stamp scan, except for perhaps in unusual specific situations.

I might also work on improving my own scans to yield greater surface detail.

An additional piece of equipment that is useful, especially for tricky elevation/depression surface questions, and questions about overprints/cancels (which was applied first?), is the binocular microscope (stereo view microscope). And a coin collector friend, who has one, is loaning me his stereo microscope. !! Stay tuned.

Note: Dan Harding (revenuecollector) has graciously given permission to use his stamp scan for this blog post. Thanks Dan!

Comments appreciated!

Sunday, May 20, 2018

French Guinea - Bud's Big Blue

Republic of Guinea Stamps
Bud's Big Blue
Bud's Observations
Almost due east across the Atlantic from French Guiana is French Guinea which, unlike French Guiana, did follow the path toward independence from mother France; the Republic of Guinea dates from 1958. 

As expected, the new Republic’s stamps feature splashy colors and Islamic resisters of imperialism (see above) verses classical era’s staid French officials and happy natives, all in muted colors.

The 1913 design for which BB provides many spaces is titled “Ford at Kitim” in Scott’s Catalog. In it, three men ford a stream. Kitim, however, appears to have dropped off the map, or maybe never was. The stony mountain in the background looks very much like Mount Loura. If it is, then the river could be the headwaters of the Gambia (Gambra) near Kinita. Who knows?

General Louis Faidherbé and Dr. Noel Eugene Bally, both colonial officials the latter being recruited by Pierre Savorgnan de Brazza, repeat their appearances on the 1906 issues of several west African nations, as do the oil palms. Higher values are expensive and rarely cancelled.

Sadly, no raucous guinea fowl turn up during the classical era (well, maybe abstractly on the “Kitim” stamps). They have to wait for the Republic to honor them properly.

Census: 139 in BB spaces, 45 on supplement pages.

Jim's Observations
In 1894, Dahomey, Cote-d'Ivoire, and the Colony of French Guinea (former name Rivieres du Sud) became "independent" colonies, although French Guinea was actually formed in 1891. In 1904, the Afrique Occidentale Française association was formed under the Governor General in Dakar with lieutenant governors for French Guinea, Dahomey, Senegal, Cote-d'Ivoire, and Upper Senegal and Niger.

French Guinea was a colonial possession of France until 1958, when it became independent as "Guinea".

The largest issue was monstrous, consisting of 42 stamps, all with the "Ford at Kitim" central vignette design. As is typical for the colonial French stamps of the era, they had one color for the border, and the other for the scene. The French seemed to use every color of the rainbow for their stamps. These stamps were issued in waves from 1913-1933.

French Guinea Blog Post and BB Checklist

Page 1 (Click and enlarge for examination)

1a

1b

1c

Page 2

2a

2b

2c

Page 3

3a

3b

3c

Page 4

4a

4b

4c

4d

Page 5

5a

5b

5c

5d

Supplements
Page 1

Page 2

Comments appreciated!